Table of Contents
はじめに
こんにちは、名古屋駅周辺でDevOpsエンジニアをやっている まるちゃん です。
社内Blogが立ち上がりましたので、前職でお蔵入りしてしまった記事をアウトプットしていきたいと思います。
大変めんどくさい・・・FFMPEG環境の構築とかをしなくても、簡単にHLSとMPEG-DASHの同時出力&録画機能付きのLive配信サーバの構築方法です。
基本的にコピペをしたら、すぐに試せれる!を心がけています。
Live配信サーバ構築
環境概要編
インスタンスのスペック
| 項目 | 値 |
|---|---|
| OS | Amazon Linux2/CentOS 7 |
| Type | t2.smail |
| Disk | 15GB |
開放ポート
| 項目 | 値 |
|---|---|
| SSH | 22 |
| HTTP | 80 |
| RTMP | 1935 |
Nginx+nginx-rtmp-moduleのインストール編
関連パッケージインストール
|
1 |
$ yum -y install git gcc pcre-devel openssl-devel |
任意の作業ディレクトリを作成
今回は、/root/works になります。
|
1 |
$ mkdir works |
Nginxダウンロード & Nginx展開
こちらで環境に合ったバージョンをダウンロード
|
1 2 3 |
$ cd ~/works/ $ wget https://nginx.org/download/nginx-1.14.0.tar.gz $ tar zxvf nginx-1.14.0.tar.gz |
nginx-rtmp-moduleをインストール
使用するモジュールは、NGINX-based Media Streaming Server
MPEG-DASHとHLS対応のモジュールをクローン
|
1 2 3 4 5 |
$ cd nginx-1.14.0/ $ git clone https://github.com/arut/nginx-rtmp-module.git $ ./configure --add-module=nginx-rtmp-module/ $ make $ make install |
Nginxの設定編
Config設定
HLS・MPEG-DASH・FLVを何処に出力するかを指定
|
1 |
$ vi /usr/local/nginx/conf/nginx.conf |
|
1 2 3 4 5 6 7 8 9 10 11 12 13 14 15 16 17 18 19 20 21 22 23 24 25 26 27 28 29 30 31 32 33 34 35 36 37 38 39 40 41 42 43 44 45 46 47 48 49 50 51 52 53 54 55 56 57 58 59 |
worker_processes auto; error_log logs/error.log error; events { worker_connections 1024; } rtmp_auto_push on; rtmp { server { listen 1935; access_log logs/rtmp_access.log; chunk_size 4096; timeout 10s; application live { live on; # HLSの記述欄 hls on; hls_path /var/www/html/hls; hls_fragment 10s; # MEPG-DASHの記述欄 dash on; dash_path /var/www/html/dash; dash_fragment 10s; # FLVの記述欄 record all; record_path /var/www/html/flv; record_unique on; } } } http { server { listen 80; include mime.types; default_type application/octet-stream; server_name localhost; add_header Access-Control-Allow-Origin *; location /hls { types { application/vnd.apple.mpegurl m3u8; } root /var/www/html/; } location /dash { types { application/vnd.apple.mpegurl mpd; } root /var/www/html/; } } } |
FLVの出力ディレクトリの作成
- ディレクトリを作成後にユーザーとグループをnobodyに変更
|
1 2 |
$ mkdir -p /var/www/html/flv $ chown nobody. /var/www/html/flv |
Configの確認
もしOKと表示されていない場合は、記述ミスか、手順ミスのどちらかになります。
|
1 2 3 4 |
$ /usr/local/nginx/sbin/nginx -t nginx: the configuration file /usr/local/nginx/conf/nginx.conf syntax is ok nginx: configuration file /usr/local/nginx/conf/nginx.conf test is successful |
サービス起動のスクリプトを作成
|
1 |
$ vi /usr/lib/systemd/system/live_nginx.service |
|
1 2 3 4 5 6 7 8 9 10 11 12 13 |
[Unit] Description=nginx - high performance web server Documentation=http://nginx.org/en/docs/ After=network.target remote-fs.target nss-lookup.target [Service] Type=forking ExecStartPre=/usr/local/nginx/sbin/nginx -t -c /usr/local/nginx/conf/nginx.conf ExecStart=/usr/local/nginx/sbin/nginx -c /usr/local/nginx/conf/nginx.conf ExecReload=/bin/kill -s HUP $MAINPID ExecStop=/bin/kill -s TERM $MAINPID PrivateTmp=true [Install] WantedBy=multi-user.target |
サービス起動 & 自動起動
起動
|
1 |
$ systemctl start live_nginx.service |
自動起動
|
1 2 3 |
$ systemctl enable live_nginx.service Created symlink from /etc/systemd/system/multi-user.target.wants/live_nginx.service to /usr/lib/systemd/system/live_nginx.service. |
Playerの準備編
使用する動画コンテンツ
今回は”Big Buck Bunny”コンテンツをダウンロードしました。
HLSのPlayer
player.setSrc(“hls/obs_test.m3u8”); の、hls/obs_test を自分の配信環境に合わせる
|
1 |
$ vi /usr/local/nginx/html/hp_hls.html |
|
1 2 3 4 5 6 7 8 9 10 11 12 13 14 15 16 17 18 19 20 21 22 23 24 25 26 27 |
<!DOCTYPE html> <html> <head> <meta charset="utf-8"> <title>MediaElement</title> <!-- MediaElement style --> <link rel="stylesheet" href="//cdnjs.cloudflare.com/ajax/libs/mediaelement/4.2.9/mediaelementplayer.css" /> </head> <body> <!-- MediaElement --> <script src="//cdnjs.cloudflare.com/ajax/libs/mediaelement/4.2.9/mediaelement-and-player.js"></script> <video id="player" width="640" height="360"> </body> <script type="text/javascript"> var player = new MediaElementPlayer('player', { success: function(mediaElement, originalNode) { console.log("Player initialised"); } }); player.setSrc("hls/obs_test.m3u8"); </script> </html> |
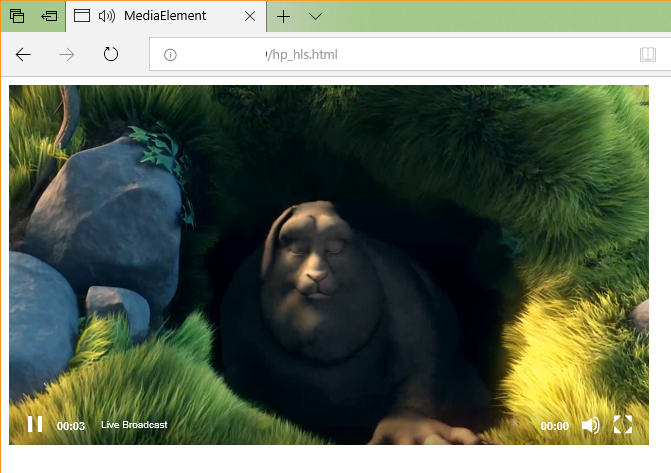
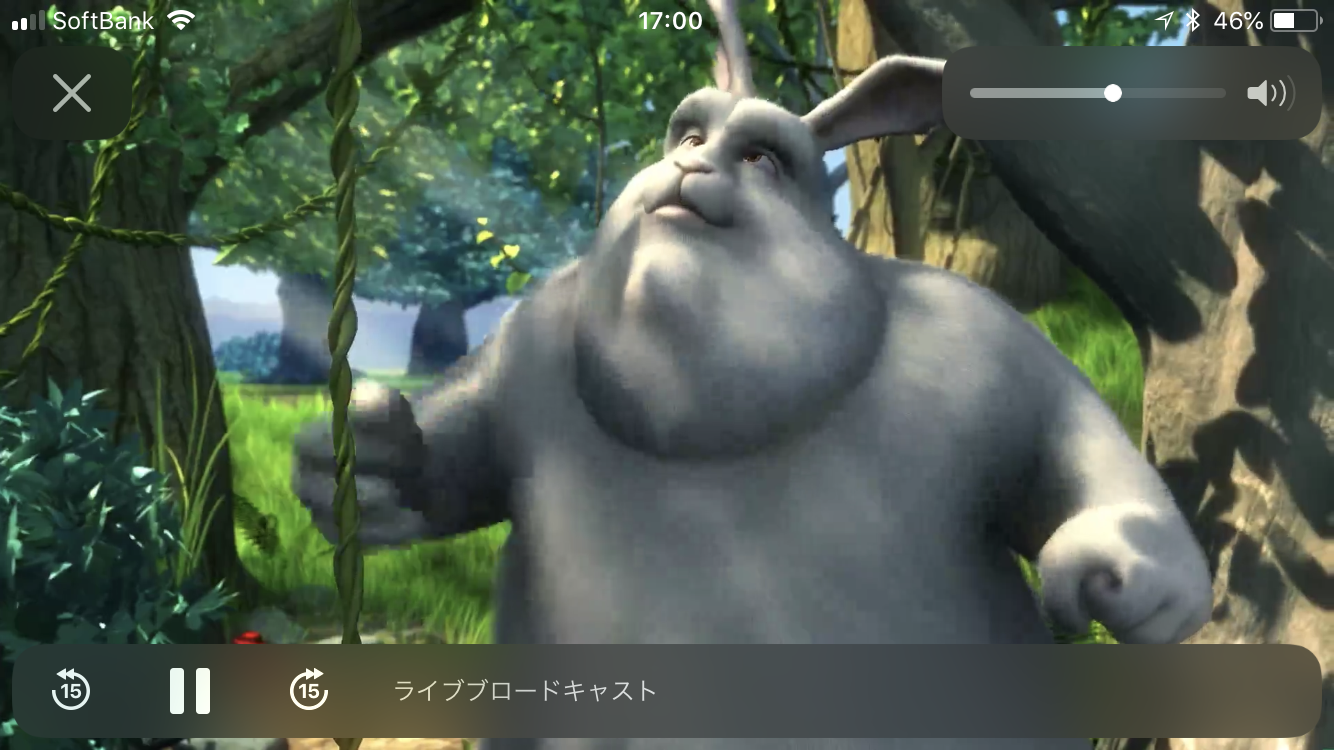
Live配信をおこなうと以下の様な感じで表示されます
ブラウザーの場合
iphoneの場合
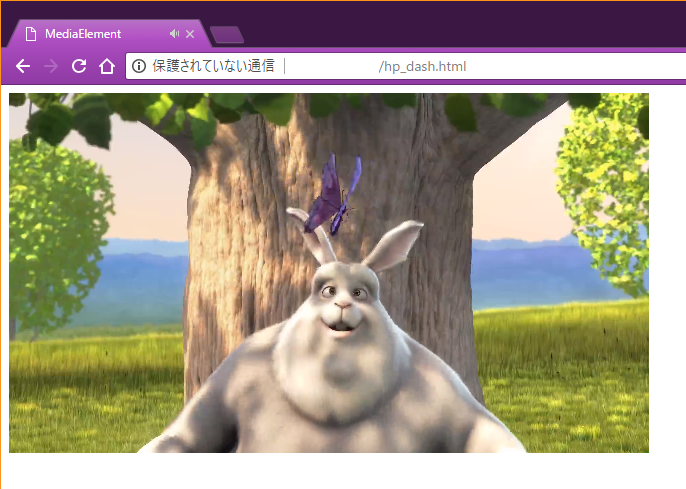
MPEG-DASH のPlayer
player.setSrc(“dash/obs_test.mpd”); の、dash/obs_test を自分の配信環境に合わせる
|
1 |
$ vi /usr/local/nginx/html/hp_dash.html |
|
1 2 3 4 5 6 7 8 9 10 11 12 13 14 15 16 17 18 19 20 21 22 23 24 25 26 |
<html> <head> <meta charset="utf-8"> <title>MediaElement</title> <!-- MediaElement style --> <link rel="stylesheet" href="//cdnjs.cloudflare.com/ajax/libs/mediaelement/4.2.9/mediaelementplayer.css" /> </head> <body> <!-- MediaElements --> <script src="//cdnjs.cloudflare.com/ajax/libs/mediaelement/4.2.9/mediaelement-and-player.js"></script> <video id="player" width="640" height="360"> </body> <script type="text/javascript"> var player = new MediaElementPlayer('player', { success: function(mediaElement, originalNode) { console.log("Player initialised"); } }); player.setSrc("dash/obs_test.mpd"); </script> </html> |
Live配信をおこなうと以下の様な感じで表示されます
ブラウザーの場合
閲覧可能な形式の種類をまとめました
代表的なブラウザーなどで検証閲覧が可能かの検証結果を載せておきます。
http://global-IP/<対象のURL>
PC Chrome
| URL | 回答 |
|---|---|
| hp_hls.html | OK |
| hp_dash.html | OK |
| hls/obs_test.m3u8 | NO |
| dash/obs_test.obs.mpd | NO |
PC Safari
| 項目 | 値 |
|---|---|
| hp_hls.html | OK |
| hp_dash.html | OK |
| hls/obs_test.m3u8 | OK |
| dash/obs_test.obs.mpd | NO |
iPhone(Safari/Chrome)
| 項目 | 値 |
|---|---|
| hp_hls.html | OK |
| hp_dash.html | NO |
| hls/obs_test.m3u8 | OK |
| dash/obs_test.obs.mpd | NO |
配信方法 編
Open Broadcaster Softwareを使用します。

メディアソースかWebカメラなどを配置したら配信開始をクリック!

Live配信を見るには?
HLS の場合
http://global-IP/hp_hls.html
|
1 2 3 4 5 6 7 8 9 10 11 |
$ ll /var/www/html/hls/ total 10160 -rw-r--r-- 1 nobody nobody 1579200 Aug 5 08:22 obs_test-52.ts -rw-r--r-- 1 nobody nobody 1571868 Aug 5 08:22 obs_test-53.ts -rw-r--r-- 1 nobody nobody 1597248 Aug 5 08:22 obs_test-54.ts -rw-r--r-- 1 nobody nobody 1554196 Aug 5 08:22 obs_test-55.ts -rw-r--r-- 1 nobody nobody 1566416 Aug 5 08:23 obs_test-56.ts -rw-r--r-- 1 nobody nobody 1538216 Aug 5 08:23 obs_test-57.ts -rw-r--r-- 1 nobody nobody 728688 Aug 5 08:23 obs_test-58.ts -rw-r--r-- 1 nobody nobody 230 Aug 5 08:23 obs_test.m3u8 |
http://global-IP/hp_dash.html
|
1 2 3 4 5 6 7 8 9 10 |
$ ll /var/www/html/dash/ -rw-r--r-- 1 nobody nobody 3081483 Aug 7 01:09 obs_test-81999.m4v -rw-r--r-- 1 nobody nobody 88975 Aug 7 01:09 obs_test-91999.m4a -rw-r--r-- 1 nobody nobody 1243711 Aug 7 01:09 obs_test-91999.m4v -rw-r--r-- 1 nobody nobody 596 Aug 7 01:08 obs_test-init.m4a -rw-r--r-- 1 nobody nobody 659 Aug 7 01:08 obs_test-init.m4v -rw-r--r-- 1 nobody nobody 2094 Aug 7 01:09 obs_test.mpd -rw-r--r-- 1 nobody nobody 87307 Aug 7 01:09 obs_test-raw.m4a -rw-r--r-- 1 nobody nobody 1241451 Aug 7 01:09 obs_test-raw.m4v |
録画先
設定で record_unique on にしているので、ファイル名がかぶる事はありません。
こちらは、次回使用します。
|
1 2 3 4 5 6 |
$ ll flv/ total 86852 -rw-r--r-- 1 nobody nobody 32139979 Aug 7 01:09 obs_test-1533604079.flv -rw-r--r-- 1 nobody nobody 2394599 Aug 7 01:13 obs_test-1533604400.flv -rw-r--r-- 1 nobody nobody 54398087 Aug 7 01:16 obs_test-1533604410.flv |
以上でHLSとMPEG-DASHの手軽なLiveサーバ構築でした。
最後に
今回のソース一覧は、GitHubにて公開を行なっております。
FFMPEGを使用しなくても、Live配信ができる事を知れて勉強になりました。